
Working with real customer’s deployment requires managing multiple environments – at least Test and Production or additionally a Dev environment. One of the common patterns we use in the solutions is to use Azure Functions as an effective, serverless extension of the point-and-click Power Automate flows. This pattern utilises a Custom Connector created to embed the function call and parameters into the flow. This pattern is described in a bit more detail in another post, but here is a quick picture if we use one environment:
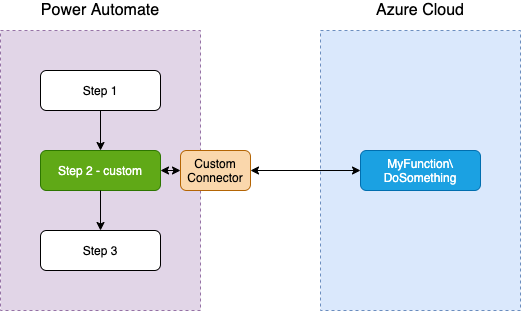
While creating a custom connector is relatively easy and requires no coding as such, it uses the Azure function URL composed of a base endpoint and path for separate operations. With Power Platform multiple environments capability, the challenge exists – how might we also have an Azure function version working with these different environments?
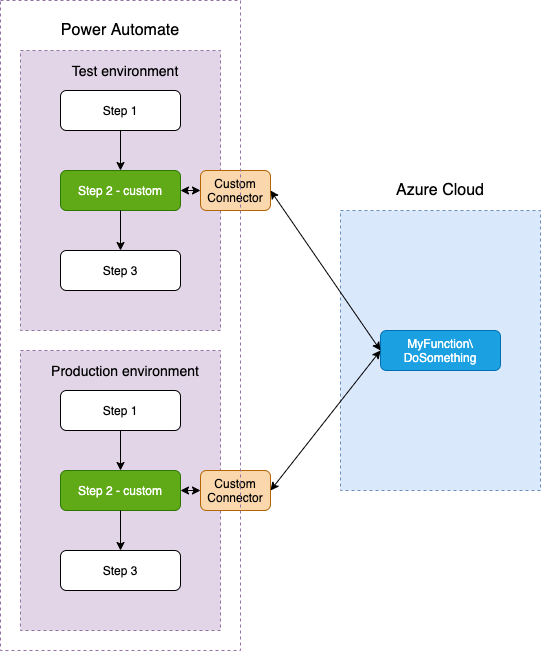
If we use the same function across both Power Automate environments, this is no good – we cannot manage changes in test/dev while the function is used for production load:
Now then, how might we make a deployment of a Power Automate flow and make it work with another version of an Azure Function?
This is where of Azure Functions deployment slots come handy. Deployment slots provide separate Azure Function versions so you can have deployed separately a Test version while another Production version is in use.
While the slots are great, this is achieved by Azure Functions deployed into slots that have in the result URLs in separate domains. E.g., if a function MyFunction implements an operation DoSomething, the URLs would be:
- https://myfunction.azurewebsites.net/api/DoSomething – production slot
- https://myfunction-uat.azurewebsites.net/api/DoSomething – UAT test version
As you can see, the second URL domain part is different: myfunction-uat vs myfunction.
This is a bit of a problem for Power Platform custom connector as it requires the domain to be the part of the definition and this is not parametrised! What it means, that you cannot have the ability to specify the varying on environments domain part as a parameter.
Yes, you could create a separate custom connector altogether – one having myfunction-uat as a base URL and another as myfunction, but that’s a bad idea. Just think what happens when you’ve built a flow having this connector as a step. When deployed into another environment (e.g. in Test from Dev), you’d need to replace the connector for another one, which involves deleting one and adding another as a step. That would ruin all your subsequent steps relying on the output of the connector and would require you to go through all such steps and update them. And this would be required on every deployment, including production – so this is not workable.
A better solution to this problem is offered by the sometimes overlooked capability of Azure Functions – the Function Proxies.
Proxies are elements of configuration and designed to provide a layer of translation of API client-facing interface into an internal structure which can be implemented even by different resources. And this is exactly what we need! So, the idea is simple:
- Use azure functions slots to maintain multiple versions of the functions as explained earlier
- In the Power Platform’s custom connector use a connection (ideally) or a parameter (as a quick fix) to differentiate environments. This means that on deployment you’d need only to change the parameter or select the connection.
- Define the function proxies to translate the parametrised value into the different endpoints to call!

So, let’s break the above into the steps to do.
For our example let’s assume you have the 2 versions of the Azure Function MyFunction\DoSomething with the production and UAT URLs as listed earlier:
- https://myfunction.azurewebsites.net/api/DoSomething – production slot
- https://myfunction-uat.azurewebsites.net/api/DoSomething – UAT test version
Let’s also assume that the function takes one parameter called “input“.
Depending on the tool you use to develop these functions, you can specify proxies in these tools (VS Code or Visual Studio) or the Azure portal itself. In either case, you need to create or modify the file “proxies.json” and have the following lines there (for our made-up example):
{
   "$schema": "http://json.schemastore.org/proxies",
   "proxies": {
      "MyFunction_PROD": {
         "matchCondition": {
            "methods": [ "POST" ],
            "route": "/api/DoSomething/prod"
         },
         "backendUri": "https://myfunction.azurewebsites.net/api/DoSomething"
      },
      "MyFunction_UAT": {
         "matchCondition": {
            "methods": [ "POST" ],
            "route": "/api/DoSomething/uat"
         },
         "backendUri": "https://myfunction-uat.azurewebsites.net/api/DoSomething"
      }
   }
}
Notice the following:
- There are 2 proxies defined – MyFunction_PROD and MyFunction_UAT
- They contain the environments designators “prod” and “uat” as part of the API “route”, which will translate into parameters in the custom connector (see below)
- The backendUris are different and pointing into the different Azure function slots, as we need it.
Having done and deployed the above, you can create now a custom connector and use the configuration parameters in the flow.
Creating a custom connector from blank is described here https://docs.microsoft.com/en-us/connectors/custom-connectors/define-blank, but for the purpose of this post, it basically boils down to the following:
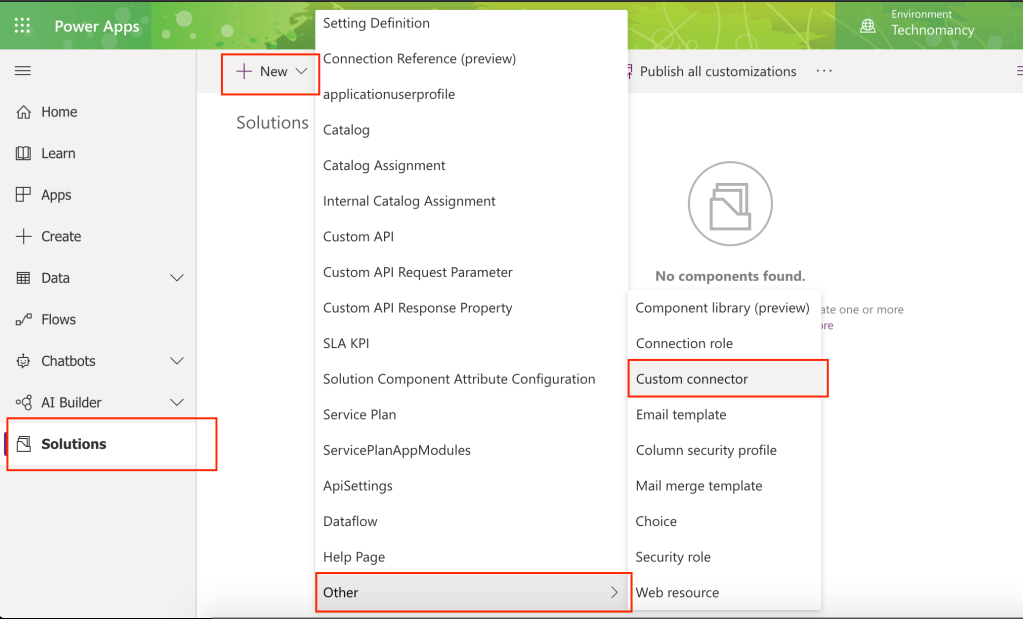
- In your solution (start from the solution!) create a new Custom Connector from blank
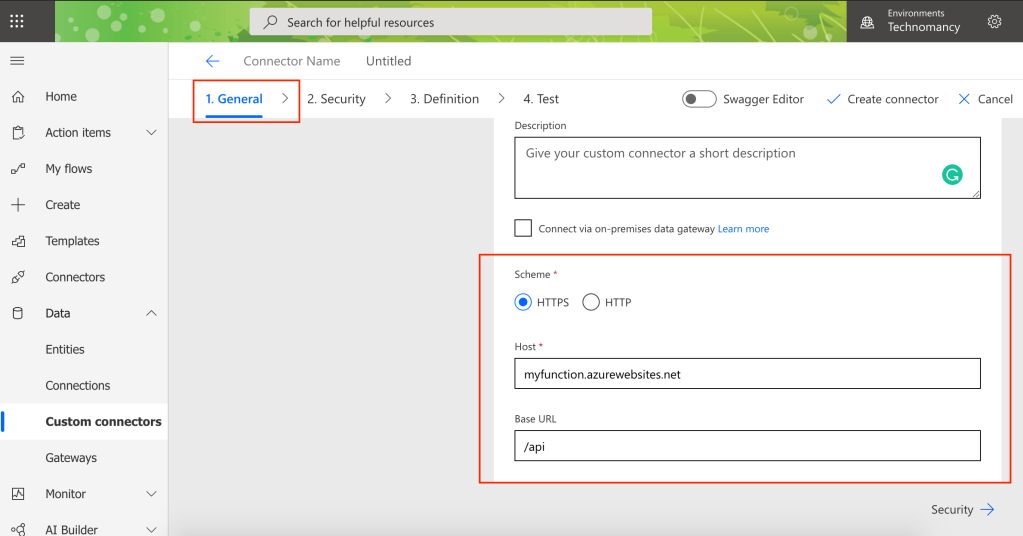
2. On the General tab:
- Name it (in our example it is “DoSomething”)
- Specify host as the domain of your production base URL of your function (e.g. “myfunction.azurewebsites.net”)
- Base url: “/api” (this is the same for all azure functions)

3. On the Security tab leave “No authentication” and proceed to the Definition tab
4. In the Definitions tab use “Swagger Editor” Option and replace the paths element with the following configuration:
paths:
  /DoSomething/{env}/{input}:
    post:
      responses:
        default:
          description: default
          schema: {}
      summary: DoSomething
      description: Do something useful
      operationId: DoSomething
      parameters:
      - {name: env, in: path, required: true, type: string}
      - {name: input, in: path, required: true, type: string}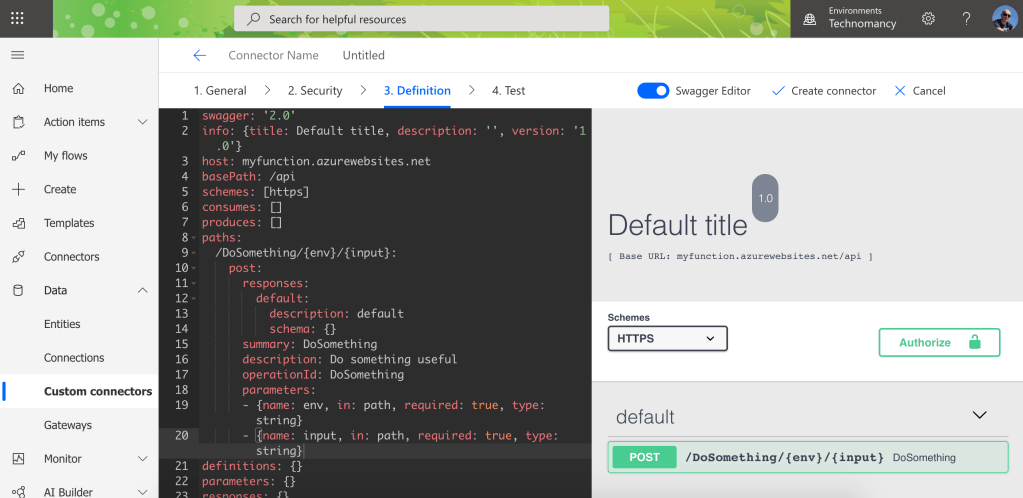
As you can see, this effectively defines 2 parameters – “env” and “input” – which can be set up and used in the flow.
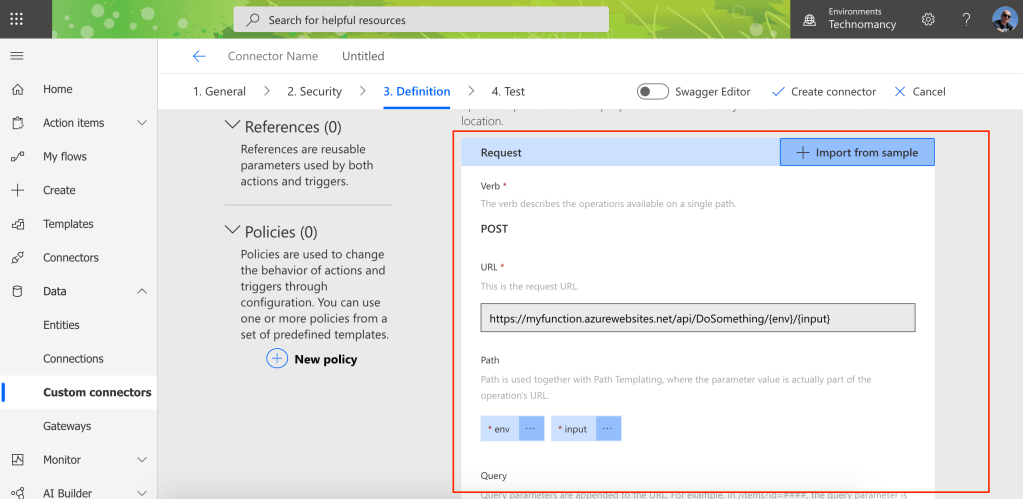
If you switch off the Swagger Editor, the resulting definition of the request should be as on the screenshot:
5. Finish it with the action “Create Connector”
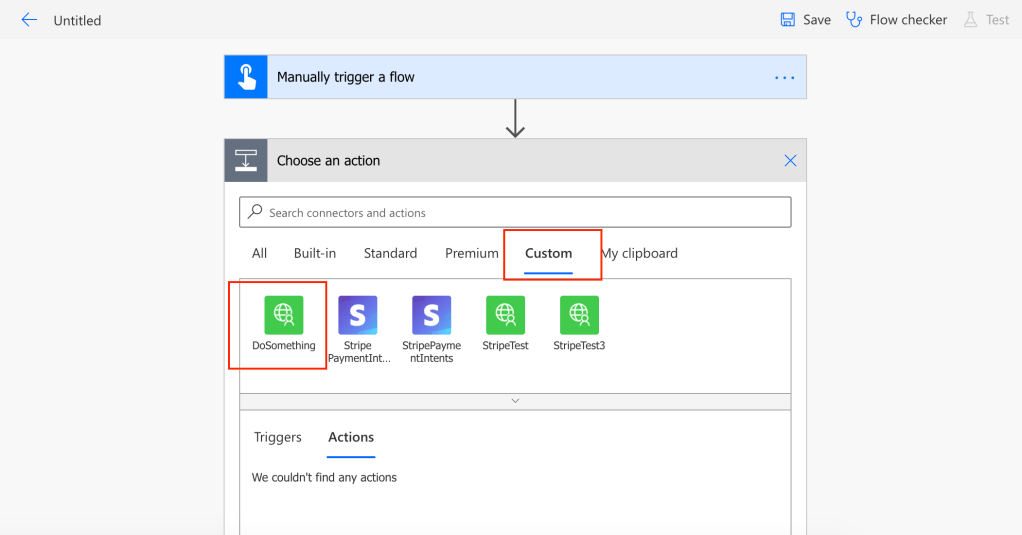
Now, the last step is to use it in your flow – just add the custom connector step “DoSomething” and specify the parameters:
- the “env” parameter value as either “prod” or “uat” strings
- Other parameters (“input”) value as required.
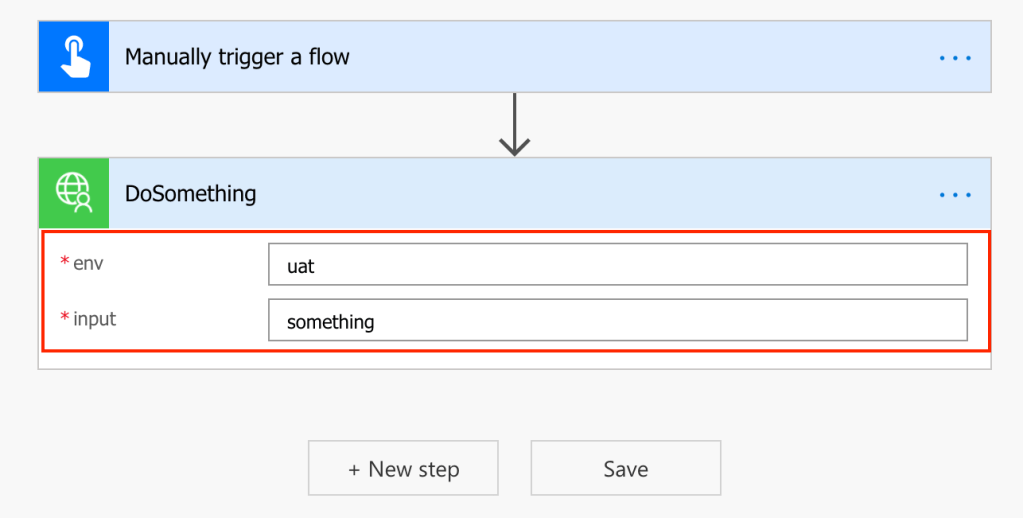
When you deploy your creation into another environment, the only thing you need to change is the string in the “env” parameter, e.g. from “uat” to “prod”. Now you have 2 Power Platform environments working with 2 different versions of your Azure Function!
This is basically what needs to be done. Before concluding this post, I’d like to take just a couple more notes.
Azure Function slots have the “Swap” option which basically exchanges the content of the slots and with Test and Prod versions slots:
- Promotes the Test version into Production slot
- Save the previous Production version into the Test slot.
I found this is not really helpful when working with multiple environments as the old function version will start breaking my Test environment. In order to avoid that, I deploy directly into the slots from VS Code I use. So, as a result of that, both Test and Prod version are synced on deployment to production and I can continue tests.
Also, while the above was written mostly in the context of Azure Functions, any other external API supporting Proxy layers can be used with the same effect – including AWS, Google cloud etc.
I hope this makes sense and helps you to build robust multi-environment solutions for your customers or products. Please let me know how it worked for you and if you have found any better options for solving this.
